OMD the Open Monitoring Distribution, which implements a completely new concept of how to install, maintain and update a monitoring system built on Nagios. So it this post we will install the OMD in Centos 7 Linux.
In my case


OOPS!, I got 500 Internal Server , When I try to log in. When I inspected the apache log, error.log file, It reports that the problem is with the mod_python, that apache can't load. But the problem is not the mod_python module, as it is already present. I spent more that 4 hours on googling and fixing this problem. the problem is with hashlib.py file which is located at /omd/versions/1.30/lib/python/hashlib.py, as there is a bug in this file, so I copied the hashlib.py of my OS to /omd/versions/1.30/lib/python/hashlib.py dir, which is shown below. Before copying the file, first delete the hashlib.pyc file, which is the compiled version of hashlib.py file, and then copy the hashlib.py file from System OS, this will fix the problem.
 Choose one of the GUI, I will stick with check_mk as shown below
 .
Ok, the server configuration has been finished, To monitor and configure the client, check about check_mk_agent. Have a look on this to check about check_mk_agent. https://mathias-kettner.de/checkmk_linuxagent.html
.
Ok, the server configuration has been finished, To monitor and configure the client, check about check_mk_agent. Have a look on this to check about check_mk_agent. https://mathias-kettner.de/checkmk_linuxagent.html
Downloading the repository file
rpm -Uvh "https://labs.consol.de/repo/stable/rhel7/i386/labs-consol-stable.rhel7.noarch.rpm"Let us update the system, so that we can have the package index from the labs-consol repository,
yum updateNow, we just updated our system, so let us search from the omd Open Monitoring Distribution
yum search omdThe above command list the following packages.
isomd5sum-devel.i686 : Development headers and library for using isomd5sum
isomd5sum-devel.x86_64 : Development headers and library for using isomd5sum
omd.noarch : OMD - OpenSource Monitoring Distribution
omd-1.30.x86_64 : OMD - OpenSource Monitoring Distribution
omd-2.10-labs-edition.x86_64 : OMD Labs Edition - OpenSource Monitoring
                             : Distribution (Labs Edition)
omd-labs-edition.noarch : OMD - OpenSource Monitoring Distribution
python-isomd5sum.x86_64 : Python bindings for isomd5sum
isomd5sum.x86_64 : Utilities for working with md5sum implanted in ISO images
php-theseer-fDOMDocument.noarch : An Extension to PHP standard DOM
I am interested with omd-1.30.x86_64 , so let's install this package.
yum install omd omd-1.30.x86_64Ok, now we have
omd-1.30.x86_64in our system, which consist of the bundle of packages like Nagios, the Nagios plugins, Check_MK, Livestatus, Multisite,PNP4Nagios, NagVis, and other addons. If you want to know more Please visit http://omdistro.org/. Ok that's it we just installed an Open Monitoring Distribution , so let's play with omd. After installing omd, it gives us a nice handy tool called omd CLI interface to create a new monitoring system, just enter omd in your terminal.
omdOn, issuing the above command it display the lot of flags, with description. So before creating a new monitoring instances, let us prepare an OS for OMD, which can be done via
omd setupcommand. Ok, let us create a new monitoring system for our infrastructure
omd create bcmonitoringThe above command will create a new monitoring instance with name bcmonitoring and it's all file are located under /opt directory. Oh! one thing, that I forget to tell you, root dir of OMD is also located at /opt/omd/ dir, as show n below. The omd dir consist of following directory structure
omd/
├── apache
│   └── bcmonitoring.conf
├── sites
│   └── bcmonitoring
└── versions
    ├── 1.30
    └── default -> 1.30
The above tree is the directory structure of omd, as you can see, our monitoring instance resides under the sites dir of omd, if you create another instance, it's configuration and data also resides under sites dir.
So, we have created a monitoring site, when we create a bcmonitoring instance, a omd will create a new user called bcmonitoring user to administrator this monitoring instance. Just do
su - bcmonitoringto configure this monitoring instance. Ok, after switching to a bcmonitoring user, we can now start, stop, update, config, backup this monitoring instance. let us start this instance.
OMD[bcmonitoring]:~$ omd startThe above command will start your bcmonitoring instance. To get the status of the monitoring instance, just issue
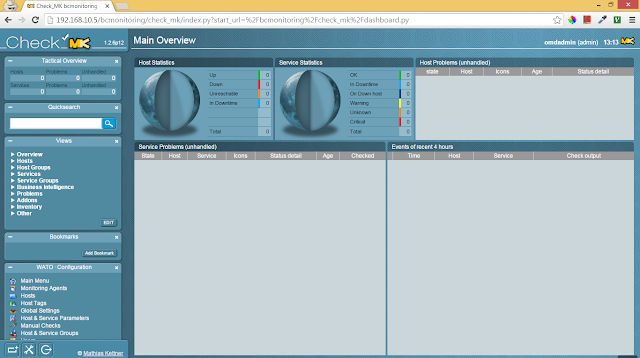
omd statuscommand. Ok let us open our monitoring server, just fire up your browser and enter the url as shown below.
In my case
http://192.168.10.5/bcmonitoringThe default username and password for the OMD instance is username: omdadmin password: omd


OOPS!, I got 500 Internal Server , When I try to log in. When I inspected the apache log, error.log file, It reports that the problem is with the mod_python, that apache can't load. But the problem is not the mod_python module, as it is already present. I spent more that 4 hours on googling and fixing this problem. the problem is with hashlib.py file which is located at /omd/versions/1.30/lib/python/hashlib.py, as there is a bug in this file, so I copied the hashlib.py of my OS to /omd/versions/1.30/lib/python/hashlib.py dir, which is shown below. Before copying the file, first delete the hashlib.pyc file, which is the compiled version of hashlib.py file, and then copy the hashlib.py file from System OS, this will fix the problem.
cp /usr/lib64/python2.7/hashlib.py /omd/versions/1.30/lib/python/hashlib.pyAfter copying, start your monitoring instance and reload the page.
omd start bcmonitoring


No comments:
Post a Comment